
Appearance
Real-time rendering & sync
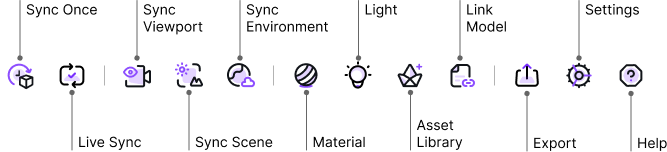
Use the D5 toolbar in your modeling software to launch Lite, sync the model or view, or connect to D5 Render.
Sync toolbar
Live Sync, Sync Once, and Sync Viewport apply to whichever product is connected: Lite or D5 Render. Only one can run at a time. Close it before switching.
Live Sync and Sync Once
Live Sync is on the first time you use Lite. On later launches, Lite restores your saved preference. Check the toolbar to see whether it's on.
- Live Sync: Turn it on to send model, material, and lighting changes to Lite automatically. Check the result in the Lite viewport.
- Sync Once: With Live Sync off, click Sync Once on the toolbar to send pending changes. In Rhino, geometry generated by Grasshopper only syncs with Sync Once.
In Revit, model sync includes native links visible in the 3D view being synced, along with their geometry, materials, and light fixtures. Move, hide, or unload links in Revit.
Sync Viewport
Sync Viewport is on the first time you use Lite. On later launches, Lite restores your saved preference. When Sync Viewport is on, Lite follows the current view in your modeling software. To move the Lite camera independently, turn it off. Press 0 in the Lite viewport to match the current view again.
Render a section
Use a section cut in SketchUp or Rhino to show the interior of your model in a Lite render. Turn on Live Sync in your modeling software, then follow the steps for your app:
- SketchUp: Exit any group or component you're editing. Place a plane with Tools > Section Plane. If the cut isn't active, double-click the section plane to activate it. Turn on Display Section Cuts. Lite only reads section planes at the top level of the model.
- Rhino: Run
_ClippingPlaneto create a clipping plane and enable it in the active viewport. If you're using an existing plane, check that it clips the active viewport.
Confirm that you can see the cut in the Lite viewport, then render a still image and check the output. Adjust the section plane in your modeling software. The cut appears in the Lite render but does not transfer when you sync the model to D5 Render.
Sync to D5 Render
Choose a workflow based on what you want to bring into D5 Render:
| Goal | What to do |
|---|---|
| See model changes in D5 Render as you work | Close Lite and connect to D5 Render from your modeling software. The sync controls now apply to D5 Render. |
| Reuse the scene's environment and effects | Update and send the scene. Model sync alone doesn't send these settings. |
| Transfer the model as a file | Open or import a supported model file in D5 Render, or export a .d5a file from your modeling software and open it in D5 Render. Both are one-time transfers. |
Export .d5a
Use the export button on the toolbar in your modeling software to save the model as a .d5a file. You can open or import it in D5 Render. Lite does not need to be running.
| Modeling software | Export scope | Hierarchy preserved |
|---|---|---|
| SketchUp | Everything, or only the selected objects | 1–2 levels |
| Rhino | Everything, or grouped by selected layers / objects | 1–3 levels |
| Revit | The whole scene (including linked models) to a chosen folder, with the host model and linked models as separate files; grouped export can be by family instance, family type, or category | Follows the export settings |
The .d5a file includes geometry and materials. It excludes lights, D5 Asset Library proxies, and scene environment and effects settings. Use scene sync to keep the settings recorded in the scene.
A .d5a export also excludes the full geometry of SketchUp custom proxies and linked .skp models. Use Connect to D5 Render to sync these models instead. For the export scope of native Revit links, see the table above.